279 results found with an empty search
- Ca Kho To Recipe
Ca Kho To, also known as Vietnamese caramelized fish, is a delicious and flavorful dish that is a staple in Vietnamese cuisine. This dish features tender fish fillets that are cooked in a savory and slightly sweet caramel sauce, resulting in a rich and complex flavor profile. Here is a detailed recipe for making Ca Kho To at home: Ingredients: - 1 lb firm white fish fillets, such as catfish or tilapia - 1/4 cup sugar - 1/4 cup fish sauce - 1/4 cup water - 2 cloves garlic, minced - 1 shallot, thinly sliced - 1/2 ct tsp black pepper - 1/2 tsp red pepper flakes (optional) - 2 tbsp vegetable oil - Green onions and cilantro for garnish - Cooked white rice for serving Instructions: 1. Begin by preparing the fish. Rinse the fish fillets under cold water and pat them dry with paper towels. Cut the fillets into smaller pieces, about 2-3 inches in size. Season the fish with black pepper and set aside. 2. In a small saucepan, heat the sugar over medium heat. Stir constantly until the sugar melts and turns into a golden caramel color. Be careful not to burn the sugar, as it can turn bitter. 3. Once the sugar has caramelized, carefully add the fish sauce and water to the saucepan. The mixture will bubble vigorously, so be cautious. Stir well to combine the caramel and liquid until smooth. 4. Add the minced garlic and sliced shallots to the saucepan. Cook for 1-2 minutes until the aromatics are fragrant. 5. Gently place the fish fillets into the saucepan, making sure they are coated evenly with the caramel sauce. Reduce the heat to low and simmer for about 15-20 minutes, or until the fish is cooked through and the sauce has thickened. 6. If desired, sprinkle red pepper flakes over the fish for a spicy kick. Stir gently to incorporate. 7. In a separate skillet, heat the vegetable oil over medium-high heat. Fry the fish fillets for 1-2 minutes on each side until they are crispy and caramelized on the edges. 8. Serve the Ca Kho To hot, garnished with sliced green onions and fresh cilantro. Enjoy this delicious dish with steamed white rice. Ca Kho To is a delightful dish that is perfect for a cozy dinner at home. The combination of tender fish and savory caramel sauce is sure to impress your family and friends. Give this recipe a try and experience the rich flavors of Vietnamese cuisine in your own kitchen. Bon appétit! Hello! We are eager to know what you think about this recipe. Have you tried it yet? How did it come out? We value any comments, opinions, or suggestions you may have. Your feedback is greatly appreciated.
- Com Tam Recipe
Com Tam, also known as broken rice, is a popular Vietnamese dish that is enjoyed by many. It is a delicious and hearty meal that is perfect for lunch or dinner. Here is a detailed recipe for making Com Tam at home. Ingredients: - 2 cups of broken rice - 1 pound of pork shoulder, thinly sliced - 1/4 cup of soy sauce - 2 tablespoons of fish sauce - 1 tablespoon of sugar - 1 teaspoon of black pepper - 1/4 cup of vegetable oil - 4 cloves of garlic, minced - 1 onion, thinly sliced - 1 cucumber, thinly sliced - 1 bunch of green onions, chopped - 1/4 cup of cilantro, chopped Instructions: 1. Start by marinating the pork shoulder. In a bowl, combine the soy sauce, fish sauce, sugar, and black pepper. Add the sliced pork shoulder to the marinade and let it sit for at least 30 minutes. 2. Rinse the broken rice under cold water until the water runs clear. Cook the rice according to the package instructions. 3. Heat a large skillet over medium-high heat and add the vegetable oil. Add the minced garlic and sliced onion and sauté until fragrant. 4. Add the marinated pork shoulder to the skillet and cook until the pork is browned and cooked through. 5. To assemble the Com Tam, place a serving of broken rice on a plate. Top with the cooked pork shoulder, sliced cucumber, chopped green onions, and cilantro. 6. Serve the Com Tam with a side of fish sauce dipping sauce and enjoy! Com Tam is a delicious and satisfying meal that is easy to make at home. With this detailed recipe, you can enjoy a taste of Vietnam in your own kitchen. Hey there! We would love to hear your thoughts on this recipe. Did you give it a try? How did it turn out? Any comments, opinions, or suggestions are more than welcome! Your feedback means a lot to us.
- Goi Cuon Recipe
Goi Cuon, also known as Vietnamese fresh spring rolls, are a delicious and healthy dish that is perfect for a light and refreshing meal. These rolls are made with fresh vegetables, herbs, and shrimp or pork, wrapped in rice paper and served with a flavorful dipping sauce. Here is a detailed recipe for making your own Goi Cuon at home: Ingredients: - 12 sheets of rice paper - 1/2 pound of cooked shrimp, peeled and deveined - 1/2 pound of cooked pork, thinly sliced - 1 cup of rice vermicelli noodles, cooked according to package instructions - 1 head of lettuce, washed and thinly sliced - 1 cucumber, julienned - 1 carrot, julienned - 1/2 cup of fresh mint leaves - 1/2 cup of fresh cilantro leaves - 1/2 cup of fresh Thai basil leaves For the dipping sauce: - 1/4 cup of hoisin sauce - 2 tablespoons of peanut butter - 1 tablespoon of soy sauce - 1 tablespoon of rice vinegar - 1 teaspoon of sugar - 1 clove of garlic, minced - Water, as needed Instructions: 1. Prepare all of your ingredients before assembling the rolls. Cook the shrimp and pork, slice the vegetables, and cook the vermicelli noodles according to package instructions. 2. Fill a shallow dish with warm water. Dip one sheet of rice paper into the water, making sure to wet both sides. Place the wet rice paper on a clean surface, such as a cutting board or plate. 3. Layer a few slices of cooked shrimp and pork on the bottom third of the rice paper. Top with a small handful of vermicelli noodles, lettuce, cucumber, carrot, mint, cilantro, and basil. 4. Fold the sides of the rice paper over the filling, then fold the bottom of the rice paper over the filling and roll tightly to enclose the filling. 5. Repeat with the remaining ingredients to make the remaining rolls. 6. To make the dipping sauce, whisk together hoisin sauce, peanut butter, soy sauce, rice vinegar, sugar, and minced garlic in a small bowl. Add water as needed to achieve your desired consistency. 7. Serve the Goi Cuon with the dipping sauce on the side. Enjoy your homemade Goi Cuon as a light and flavorful meal or appetizer. These fresh spring rolls are perfect for a healthy and delicious Vietnamese-inspired dish. Hello! We are excited to hear your thoughts on this recipe. Have you given it a try? How did it turn out? Please share any comments, ideas, or suggestions you may have. Your feedback means a lot to us.
- Bun Cha Recipe
Bun Cha is a traditional Vietnamese dish that consists of grilled pork patties served with vermicelli noodles, fresh herbs, and a tangy dipping sauce. It is a popular street food in Vietnam and is enjoyed by locals and tourists alike. Follow this detailed recipe to recreate this flavorful and aromatic dish at home. Ingredients: For the pork patties: - 1 pound ground pork - 2 cloves garlic, minced - 2 shallots, minced - 2 tablespoons fish sauce - 1 tablespoon sugar - 1 teaspoon black pepper - 1 teaspoon sesame oil For the dipping sauce: - 1/4 cup fish sauce - 1/4 cup rice vinegar - 1/4 cup sugar - 1/2 cup water - 2 cloves garlic, minced - 1 Thai chili, minced (optional) - Juice of 1 lime For serving: - Vermicelli noodles, cooked according to package instructions - Fresh herbs (cilantro, mint, Thai basil) - Lettuce leaves - Sliced cucumbers - Sliced carrots - Bean sprouts Instructions: 1. In a bowl, combine the ground pork, minced garlic, minced shallots, fish sauce, sugar, black pepper, and sesame oil. Mix well to combine all the ingredients. Shape the mixture into small patties and refrigerate for at least 30 minutes to allow the flavors to meld. 2. Preheat a grill or grill pan over medium-high heat. Grill the pork patties until they are cooked through and have a nice char on the outside, about 3-4 minutes per side. 3. While the pork patties are grilling, prepare the dipping sauce. In a small saucepan, combine the fish sauce, rice vinegar, sugar, water, minced garlic, and Thai chili (if using). Bring the mixture to a simmer and cook for 5 minutes, stirring occasionally. Remove from heat and stir in the lime juice. Let the sauce cool to room temperature before serving. 4. To serve, arrange a bowl of cooked vermicelli noodles, fresh herbs, lettuce leaves, sliced cucumbers, sliced carrots, and bean sprouts on a platter. Place the grilled pork patties on a separate plate. 5. To enjoy Bun Cha, take a small bowl and add some vermicelli noodles, fresh herbs, lettuce, cucumber, carrots, and bean sprouts. Top with a grilled pork patty and drizzle with the dipping sauce. Mix everything together before taking a bite to enjoy all the flavors and textures. 6. Serve the Bun Cha with extra dipping sauce on the side and enjoy this delicious and satisfying Vietnamese dish. 7. Bon appétit! Hey there! We would love to hear your thoughts on this recipe. Did you give it a try? How did it turn out? Any comments, opinions, or suggestions are more than welcome! Your feedback means a lot to us.
- Banh Mi Recipe
Banh Mi is a delicious Vietnamese sandwich that combines French influence with traditional Vietnamese flavors. This sandwich is typically made with a crusty baguette filled with a variety of savory ingredients that create a perfect balance of flavors and textures. Here is a detailed recipe for making Banh Mi at home: Ingredients: - 1 baguette or French bread - 1/2 pound of thinly sliced cooked pork (can use pork belly, pork loin, or roast pork) - 1/2 cup of pickled carrots and daikon (can be purchased or made at home) - 1/4 cup of sliced cucumber - 1/4 cup of fresh cilantro leaves - 1/4 cup of sliced jalapenos - 1/4 cup of mayonnaise - 1/4 cup of soy sauce - 1 tablespoon of fish sauce - 1 tablespoon of sugar - 1 tablespoon of vegetable oil - 1 clove of minced garlic - Salt and pepper to taste Instructions: 1. Preheat the oven to 350 degrees Fahrenheit. 2. Slice the baguette in half lengthwise, leaving one side connected. Place the baguette in the oven for a few minutes to warm and crisp up the bread. 3. In a small bowl, mix together the mayonnaise, soy sauce, fish sauce, sugar, garlic, salt, and pepper to create a flavorful sauce. 4. Heat the vegetable oil in a skillet over medium heat. Add the sliced pork and cook until heated through and slightly crispy on the edges. 5. Spread the sauce on both sides of the baguette. 6. Layer the pickled carrots and daikon, sliced cucumber, cooked pork, sliced jalapenos, and cilantro on one side of the baguette. 7. Close the sandwich and press down gently to help the ingredients meld together. 8. Cut the sandwich into individual portions and serve immediately. Enjoy your homemade Banh Mi sandwich with a side of Vietnamese pickles or a refreshing iced tea. This sandwich is perfect for a quick and satisfying lunch or dinner option that is sure to impress your friends and family. Bon appétit! Hey there! We would love to hear your thoughts on this recipe. Did you give it a try? How did it turn out? Any comments, opinions, or suggestions are more than welcome! Your feedback means a lot to us.
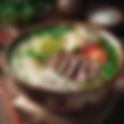
- Pho Recipe
Pho is a Vietnamese noodle soup that is beloved for its complex flavors and comforting warmth. It is typically made with a flavorful broth, rice noodles, herbs, and meat or tofu. While it may seem intimidating to make at home, with a few key ingredients and some patience, you can create a delicious bowl of pho that rivals your favorite restaurant. Ingredients: - 2 pounds of beef bones (such as oxtail or marrow bones) - 1 onion, halved - 1 piece of ginger, about 4 inches long, halved lengthwise - 4 star anise pods - 6 whole cloves - 1 cinnamon stick - 1 cardamom pod - 1 teaspoon coriander seeds - 1 tablespoon fish sauce - 1 tablespoon sugar - Salt, to taste - 1 pound of beef brisket or flank steak, thinly sliced - 1 pound of rice noodles - Garnishes: bean sprouts, Thai basil, cilantro, lime wedges, sliced jalapenos Instructions: 1. Begin by roasting the beef bones in a 400°F oven for about 30 minutes, until they are browned and caramelized. 2. In a large stockpot, add the roasted beef bones, onion, and ginger. Fill the pot with enough water to cover the bones by a few inches. Bring the water to a boil, then reduce the heat to a simmer. 3. While the broth is simmering, prepare the spice packet by placing the star anise, cloves, cinnamon stick, cardamom pod, and coriander seeds in a piece of cheesecloth and tying it securely with kitchen twine. 4. Add the spice packet to the broth, along with the fish sauce, sugar, and salt. Let the broth simmer for at least 2 hours, skimming off any impurities that rise to the surface. 5. Once the broth is done simmering, strain it through a fine mesh sieve to remove the bones and aromatics. Adjust the seasoning with more fish sauce, sugar, or salt as needed. 6. Prepare the rice noodles according to the package instructions, then divide them among serving bowls. 7. Top the noodles with the thinly sliced beef brisket or flank steak. 8. Ladle the hot broth over the noodles and beef, ensuring that the meat cooks through in the hot broth. 9. Serve the pho hot, garnished with bean sprouts, Thai basil, cilantro, lime wedges, and sliced jalapenos. Enjoy your homemade bowl of pho and savor the rich flavors and comforting warmth that this dish has to offer. Hey there! We would love to hear your thoughts on this recipe. Did you give it a try? How did it turn out? Any comments, opinions, or suggestions are more than welcome! Your feedback means a lot to us.
- Top 10 Thailand Recipes
Discover the top 10 authentic Thai recipes that will transport your taste buds to the vibrant streets of Thailand. From the iconic Pad Thai to the spicy Tom Yum soup, these dishes are bursting with bold flavors and fresh ingredients. Whether you're a fan of tangy curries or savory stir-fries, Thai cuisine offers a diverse range of delicious dishes to satisfy every palate. Prepare to embark on a culinary adventure with these must-try recipes that capture the essence of Thai cooking. 1. Pad Thai. 2. Green curry. 3. Tom Yum Goong. 4. Som Tum. 5. Massaman curry. 6. Pad Krapow Moo 7. Larb Gai 8. Gaeng Keow Wan Gai 9. Khao Pad 10. Tom Kha Gai 1. Pad Thai - A classic Thai stir-fried noodle dish made with rice noodles, shrimp, tofu, eggs, and a flavorful sauce made of tamarind, fish sauce, and chili paste. Click here to view the complete recipe 2. Green Curry - A fragrant and spicy Thai curry made with coconut milk, green curry paste, vegetables, and your choice of protein such as chicken, shrimp, or tofu. Click here to view the complete recipe 3. Tom Yum Goong - A hot and sour soup made with lemongrass, kaffir lime leaves, galangal, shrimp, and mushrooms, flavored with fish sauce, lime juice, and chili peppers. Click here to view the complete recipe 4. Som Tum - A refreshing and spicy green papaya salad made with shredded green papaya, tomatoes, green beans, peanuts, and a tangy dressing made with lime juice, fish sauce, and palm sugar. Click here to view the complete recipe 5. Massaman Curry - A rich and creamy Thai curry made with coconut milk, Massaman curry paste, potatoes, onions, and your choice of protein such as beef or chicken. Click here to view the complete recipe 6. Pad Krapow Moo - A simple yet flavorful dish of stir-fried minced pork with garlic, Thai basil, chili peppers, and fish sauce, served over steamed rice with a fried egg on top. Click here to view the complete recipe 7. Larb Gai - A spicy and tangy Thai salad made with minced chicken, lime juice, fish sauce, chili peppers, and fresh herbs like mint and cilantro. Click here to view the complete recipe 8. Gaeng Keow Wan Gai - A Thai green curry made with chicken, eggplant, bamboo shoots, and bell peppers, flavored with green curry paste, coconut milk, and Thai basil. Click here to view the complete recipe 9. Khao Pad - A popular Thai fried rice dish made with jasmine rice, eggs, vegetables, and your choice of protein such as chicken, shrimp, or pork, seasoned with soy sauce and fish sauce. Click here to view the complete recipe 10. Tom Kha Gai - A creamy and fragrant Thai coconut soup made with chicken, mushrooms, galangal, lemongrass, and kaffir lime leaves, flavored with coconut milk, fish sauce, and lime juice. Click here to view the complete recipe Hey there! We would love to hear your thoughts on this recipe. Did you give it a try? How did it turn out? Any comments, opinions, or suggestions are more than welcome! Your feedback means a lot to us.
- Tom Kha Gai Recipe
Tom Kha Gai, also known as Thai coconut soup, is a delicious and flavorful dish that combines the rich and creamy flavors of coconut milk with the tangy and spicy notes of lemongrass, galangal, and kaffir lime leaves. This traditional Thai soup is both comforting and refreshing, making it the perfect dish for any occasion. Here is a detailed recipe for making Tom Kha Gai at home: Ingredients: - 2 cans of coconut milk - 4 cups of chicken broth - 1 lb of boneless, skinless chicken breasts, thinly sliced - 1 stalk of lemongrass, cut into 2-inch pieces and smashed - 4-6 slices of galangal - 6-8 kaffir lime leaves, torn into pieces - 1 small onion, sliced - 1-2 red chilies, sliced - 1 cup of mushrooms, sliced - 2 tablespoons of fish sauce - 2 tablespoons of lime juice - 1 tablespoon of sugar - Salt to taste - Fresh cilantro leaves for garnish Instructions: 1. In a large pot, combine the coconut milk and chicken broth and bring to a simmer over medium heat. 2. Add the lemongrass, galangal, and kaffir lime leaves to the pot and simmer for about 10 minutes to infuse the flavors into the broth. 3. Add the sliced chicken breasts to the pot and cook until they are no longer pink, about 5-7 minutes. 4. Add the sliced onion, red chilies, and mushrooms to the pot and cook for another 5 minutes, or until the vegetables are tender. 5. Stir in the fish sauce, lime juice, sugar, and salt to taste. Adjust the seasoning as needed to balance the flavors of the soup. 6. Remove the lemongrass, galangal, and kaffir lime leaves from the pot before serving. 7. Ladle the Tom Kha Gai into bowls and garnish with fresh cilantro leaves. 8. Serve the soup hot and enjoy the rich and aromatic flavors of this classic Thai dish. Tom Kha Gai is best served alongside steamed jasmine rice or with a side of crispy fried tofu. This soup is a perfect balance of sweet, sour, salty, and spicy flavors that will delight your taste buds and transport you to the streets of Thailand. Enjoy! Hey there! We would love to hear your thoughts on this recipe. Did you give it a try? How did it turn out? Any comments, opinions, or suggestions are more than welcome! Your feedback means a lot to us.
- Khao Pad Recipe
Khao Pad, also known as Thai fried rice, is a classic and popular dish in Thai cuisine. This flavorful and aromatic dish is made by stir-frying cooked rice with a variety of ingredients, resulting in a delicious and satisfying meal. Here is a detailed recipe for Khao Pad: Ingredients: - 3 cups cooked jasmine rice (preferably day-old) - 2 tablespoons vegetable oil - 2 cloves garlic, minced - 1 small onion, diced - 2 eggs, beaten - 1 cup protein (such as chicken, shrimp, or tofu), diced - 1 cup mixed vegetables (such as carrots, peas, and bell peppers), diced - 2 tablespoons soy sauce - 1 tablespoon oyster sauce - 1 tablespoon fish sauce - 1 teaspoon sugar - 1/4 teaspoon white pepper - 2 green onions, chopped - Cilantro leaves for garnish - Lime wedges for serving Instructions: 1. Heat a large wok or skillet over medium-high heat. Add the vegetable oil and swirl to coat the pan. 2. Add the minced garlic and diced onion to the pan and stir-fry until fragrant, about 1-2 minutes. 3. Push the garlic and onion to one side of the pan and add the beaten eggs to the other side. Scramble the eggs until cooked through, then mix with the garlic and onion. 4. Add the diced protein to the pan and stir-fry until cooked through. 5. Add the mixed vegetables to the pan and stir-fry until slightly softened. 6. Add the cooked jasmine rice to the pan and break up any clumps with a spatula. 7. In a small bowl, combine the soy sauce, oyster sauce, fish sauce, sugar, and white pepper. Pour this sauce over the rice and stir to combine. 8. Continue to stir-fry the rice mixture until everything is well combined and heated through. 9. Taste the rice and adjust seasoning as needed. 10. Remove the pan from heat and stir in the chopped green onions. 11. Transfer the Khao Pad to serving plates and garnish with cilantro leaves. 12. Serve hot with lime wedges on the side for squeezing over the rice. Enjoy this delicious and aromatic Khao Pad as a main dish or as a side dish to complement your favorite Thai meal. It's a versatile dish that can be customized with your choice of protein and vegetables, making it a favorite among both home cooks and restaurant-goers. Hey there! We would love to hear your thoughts on this recipe. Did you give it a try? How did it turn out? Any comments, opinions, or suggestions are more than welcome! Your feedback means a lot to us.
- Larb Gai Recipe
Larb Gai is a traditional Thai dish that is packed with flavor and freshness. It is a minced chicken salad that is typically served as a main dish or as an appetizer. This dish is easy to prepare and is perfect for those looking for a healthy and delicious meal. Here is a detailed recipe for making Larb Gai: Ingredients: - 1 lb ground chicken - 2 shallots, thinly sliced - 3 cloves garlic, minced - 1 inch piece of ginger, minced - 1/4 cup fresh lime juice - 2 tbsp fish sauce - 1 tbsp soy sauce - 1 tbsp sugar - 1/2 tsp chili flakes - 1/4 cup chopped fresh cilantro - 1/4 cup chopped fresh mint leaves - 1/4 cup chopped green onions - 1/4 cup chopped roasted peanuts - Lettuce leaves, for serving - Sticky rice, for serving Instructions: 1. In a large skillet, heat some oil over medium heat. Add the ground chicken and cook until browned and cooked through, breaking it up with a spoon as it cooks. 2. Add the shallots, garlic, and ginger to the skillet and cook for another 2-3 minutes until fragrant. 3. In a small bowl, whisk together the lime juice, fish sauce, soy sauce, sugar, and chili flakes. Pour this mixture over the chicken and stir to combine. 4. Remove the skillet from the heat and let the mixture cool slightly. 5. Once the mixture has cooled, add the chopped cilantro, mint leaves, green onions, and peanuts. Stir to combine. 6. Taste and adjust the seasoning as needed, adding more lime juice, fish sauce, or sugar if desired. 7. To serve, spoon the Larb Gai onto lettuce leaves and top with a sprinkle of chopped peanuts. Serve with sticky rice on the side. 8. Enjoy your delicious and flavorful Larb Gai! Larb Gai is a versatile dish that can be customized to suit your taste preferences. Feel free to add more chili flakes for extra heat or adjust the amount of lime juice for a tangier flavor. This dish is best served fresh and is a great option for a light and healthy meal. Hey there! We would love to hear your thoughts on this recipe. Did you give it a try? How did it turn out? Any comments, opinions, or suggestions are more than welcome! Your feedback means a lot to us.
- Pad Krapow Moo Recipe
Pad Krapow Moo, also known as Thai Basil Pork, is a classic Thai dish that is both flavorful and easy to make. This dish is typically made with ground pork, fresh Thai basil, garlic, chilies, and a savory sauce. Follow this detailed recipe to create an authentic Pad Krapow Moo at home. Ingredients: - 1 lb ground pork - 2 tablespoons vegetable oil - 4 cloves garlic, minced - 2-3 Thai bird's eye chilies, minced (adjust to taste) - 1 tablespoon oyster sauce - 2 tablespoons soy sauce - 1 tablespoon fish sauce - 1 teaspoon sugar - 1 cup fresh Thai basil leaves - Steamed rice, for serving - Lime wedges, for serving Instructions: 1. Heat a wok or large skillet over medium-high heat. Add the vegetable oil and swirl to coat the pan. 2. Add the minced garlic and chilies to the pan and stir-fry for about 30 seconds, or until fragrant. 3. Add the ground pork to the pan and break it up with a spatula. Cook the pork, stirring occasionally, until it is no longer pink. 4. In a small bowl, mix together the oyster sauce, soy sauce, fish sauce, and sugar. Pour this sauce over the cooked pork and stir to combine. 5. Add the fresh Thai basil leaves to the pan and stir-fry for another minute, or until the basil leaves are wilted. 6. Taste the dish and adjust the seasoning as needed. You can add more soy sauce or fish sauce for saltiness, or more sugar for sweetness. 7. Serve the Pad Krapow Moo hot over steamed rice. Garnish with additional Thai basil leaves and lime wedges on the side. 8. Enjoy your homemade Pad Krapow Moo with its delicious combination of savory, spicy, and aromatic flavors. Note: For an extra kick of heat, you can add more Thai bird's eye chilies or drizzle some sriracha sauce over the dish before serving. You can also garnish with a fried egg on top for a traditional Thai touch. Enjoy this flavorful and aromatic Pad Krapow Moo with your family and friends for a taste of authentic Thai cuisine. Hello! We are excited to hear your thoughts on this recipe. Have you given it a try? How did it turn out? We welcome any comments, opinions, or suggestions you might have. Your feedback is greatly valued by us.
- Gaeng Keow Wan Gai Recipe
Gaeng Keow Wan Gai, also known as Thai green curry with chicken, is a popular and flavorful dish that combines the aromatic flavors of Thai green curry paste with tender pieces of chicken and creamy coconut milk. This dish is a perfect balance of spicy, sweet, and savory flavors that will delight your taste buds. Ingredients: - 1 lb boneless, skinless chicken thighs, cut into bite-sized pieces - 2 tbsp green curry paste - 1 can (14 oz) coconut milk - 1 cup chicken broth - 1 tbsp fish sauce - 1 tbsp sugar - 1 cup Thai basil leaves - 1 red bell pepper, sliced - 1 small eggplant, sliced - 1 small zucchini, sliced - 1 cup bamboo shoots - 1 tbsp vegetable oil - Salt to taste Instructions: 1. In a large pot or wok, heat the vegetable oil over medium heat. Add the green curry paste and cook for 1-2 minutes until fragrant. 2. Add the chicken pieces to the pot and cook until they are no longer pink, about 5-7 minutes. 3. Pour in the coconut milk and chicken broth, stirring to combine. Bring the mixture to a simmer. 4. Add the fish sauce and sugar to the pot, stirring well to incorporate the flavors. 5. Add the bell pepper, eggplant, zucchini, and bamboo shoots to the pot. Stir to combine all the ingredients. 6. Cover the pot and let the curry simmer for 10-15 minutes, or until the vegetables are tender and the chicken is cooked through. 7. Taste the curry and adjust the seasoning with salt, if necessary. 8. Remove the pot from the heat and stir in the Thai basil leaves. 9. Serve the Gaeng Keow Wan Gai hot over steamed rice or noodles. 10. Garnish with additional Thai basil leaves and sliced red chili, if desired. Enjoy this delicious and aromatic Gaeng Keow Wan Gai with your family and friends. The combination of flavors in this dish will transport you to the streets of Thailand with every bite. Hey there! We would love to hear your thoughts on this recipe. Did you give it a try? How did it turn out? Any comments, opinions, or suggestions are more than welcome! Your feedback means a lot to us.